.png?height=120&name=noke_vertical%20(1).png)
A compilation of information for new users of the Nokē Smart Entry system
Introduction
This guide will help you get started with using the Nokē Smart Entry (NSE) Web Portal to manage your facility. From viewing user activity and providing 24/7 access to assigning schedules and viewing user details, this guide will have you up and running in no time.
Getting Started
The Nokē Smart Entry (NSE) Web Portal is a web-based application that runs entirely online. There is no need to download or update any software. Simply click on a URL link and log in to the Web Portal using your phone number or email address and a password.
Log in to the Web Portal
Before you can log in to the Web Portal, you’ll need your 6-digit verification code. You should have received this in a text or email message. If you have it, continue with the task below. If not, contact your manager for further instructions.
To log in to the Web Portal,
Click this link www.smartentry.noke.com to navigate to the Web Portal login web page.

-
Click the Phone or Email icon, and then type in your account login credentials.
-
Click the right arrow to continue.
-
Type in your 6-digit verification code, and then click the right arrow to continue.
-
Your verification code is only valid for 24 hours, click Forgot Password? if it has expired. A new verification code will be emailed or text messaged to you.
-
-
Create a new password and confirm it to log in to the Web Portal.
Your email address or phone number and the new password you just created will be your login credentials for accessing the Web Portal and the mobile app.
Note: You can click the icon (Language) drop-down menu to change the language that is displayed in the Web Portal.
Monitoring Activity
The Activity Log allows you to view all user and entry gate activity at your facility. You can filter by activity type, date, units, entry points, and users. Additionally, you can drill down to view the details of each activity.
Open the Activity page,
You can review the activity at your facility and quickly access more detailed information from the Activity page.
To open the Activity Log,
-
Log in to the Web Portal.
-
Click the Activity tab from the Navigation menu located on the left side of the page.
-
From here, you can do the following:
-
Drill down to more detailed user information.
-
Filter and sort Activity data.
-
Create custom Activity Views.
-
Generate and export Activity reports.
-
-
Click on a user log to open the User Details page, which displays more detailed information about the activity.

Review the Filter Feature
The Filter feature lets you expand/contract, and sort the Activity Log by Activity Type, Date, Units, Entry Points, and Users. By default, the Activity Log displays the past 24 hours of activity by default. You can change the date range from the Filter by Date drop-down menu.
To review Filter by Activity Type options,
-
Log in to the Web Portal.
-
Click the Activity tab from the Navigation menu located on the left side of the page.
-
From the top of the table, click the Filter by Activity drop-down menu.

Activity Subtypes pop-up menu
-
From the Activity Subtypes pop-up menu, select the activities you want to filter by (e.g., Unlocked units) and then click Update.
A series of filters to refine the information exists. These filters include:
Filter by Activity Type:
To customize the types of activity you see (such as locks, unlocks, failed unlocks, etc.), simply choose the Filter by Activity Type dropdown. The available Activity Types are determined by your permissions.
Filter by Date:
Adjust the date range of the activity you wish to view by selecting the Filter by Date drop-down. By default, the date range is set to 24 hours, but you can change it to Last Week, Last Month, Last 3 Months, Last Year, or specify a custom timeframe.
Filter by Unit(s):
Use the Filter by Units drop-down to modify and filter the units for which you want to view activity.
Filter by Entry Point(s):
Click on the Filter by Entry Point(s) drop-down to change and filter which entry points' activity you want to see.
Filter by User(s):
Utilize the Filter by User(s) drop-down to adjust and filter the users whose activity you want to view.
Note: You can click the icon Manage Views to create and save Activity Views for future
use.
For more information on Manage Views, see our Knowledge Base Article here:
Generate a Report
You can generate Activity reports and export them as user-friendly PDF documents or email them to yourself as CSV files.
Note: Before generating a report, you’ll need to set your filters to collect only the data you want to generate in your report.
To generate a report,
-
Log in to the Web Portal.
-
Click the Activity tab from the Navigation menu located on the left side of the page.
-
Click the Export Activity icon to generate a PDF document or CSV file.

-
When you click the down-arrow icon, a new pop-up will prompt you to select your desired format. If you choose Export as PDF, the file will be downloaded directly from your browser onto your computer.
If you choose Export as Email, the files are exported as a CSV on our system's backend and sent to you via email. If you have access to multiple facilities within your company, selecting Export as Email allows you to export activity from the facility you are currently logged into, as well as any other facility you have access to.


If you don't receive the email within a few minutes, make sure to check your spam folders.

Working with Schedules and Checking Access
You can assign schedules to tenants, employees, and other users, based on the schedules that were created for your facility. You can also edit the opening and closing hours for existing schedules. Finally, you can review the unit access settings.
Assign a Schedule
You can assign a schedule to a tenant, employee, or other user from their User Details form on the Users page.
To assign a schedule,
-
Log in to the Web Portal.
-
Click the Users tab from the Navigation menu located on the left side of the page.
-
From the Users page, search for the desired user, and click on it to open the User Details page.
-
Click the Settings (gear) icon to open the Edit User page.

-
Click the Schedule tab on the left side of the Edit User page to open the Edit Schedule form.
-
Click the drop-down arrow and assign a new schedule from the list.
-
Click the Save Changes button.
-
Now the tenant has 24/7 access to the facility.

Edit a Schedule
You can change the hours for an existing schedule from the Schedules form. To edit a schedule,
-
Log in to the Web Portal.
-
Click the Hours tab from the Navigation menu located on the left side of the page.
-
From the Schedules page, click the Pencil icon to edit.

Default Schedule with Pencil (edit) icon highlighted
-
Click on the Clock icon for each of the days of the week to change the Open and Close hours.

- Change the Open and Close hours for the Weekdays, Saturdays, and Sundays, as needed.
-
Click the Save Changes button to accept the changes to the hours of operation.
Understanding the Schedules
The Nokē Smart Entry system offers four distinct scheduling options for each customer. Let's delve into the specifics of each:
Default Schedule: This serves as the primary schedule for the facility and is automatically assigned to users by default.
Office Schedule: Contrary to its name, this schedule doesn't necessarily reflect a facility's office hours. It's ideal for scenarios where a facility needs to restrict access to specific times. For instance, if a facility has clients such as auction winners who require assistance only during business hours, or if they have customers who need supervision due to policy compliance issues. The Office Schedule allows them to limit access accordingly.
Custom Schedule: An additional schedule that can be set to any hours that fit the needs of each facility. This could be used for vendors with unique operating hours, such as those responsible for trash collection or landscaping. Each facility can tailor this schedule to match their specific timeframes, ensuring access is only granted when necessary.
24-Hour Schedule: Reserved for individuals who require round-the-clock access, such as employees or business tenants. This schedule is fixed at 24/7 access and cannot be modified.
Unit Status
Explanation of the various Unit Status selections and their implications on tenant access.
-
Occupied: This status provides access to the tenant and any shared access users.
-
Available: This status provides access to only the employees of the facility.
-
Overlock: This status denies access to all employees and the tenant.
-
Pending Auction: This status provides access for either employees or the auction winner. (See more information about Auctioning a Unit)
-
Gatelocked: This status indicates that the tenant is locked out of the facility.
-
Pre-Let: This is an agreement between a landlord and a prospective tenant to enter into a lease at a date in the future.
Providing Non-Tenant Access
You can create accounts for vendors, non-tenant users, and employees of the storage facility. These users are not included in your property management system (PMS). For example, your waste management company requires access to your entry points to empty dumpsters. Since vendors only require temporary access to the facility, they can be wholly managed from the NSE Web Portal.
In addition, you can add access to multiple facilities. You might also want to provide access for your vendors after hours by creating a custom schedule just for them.
Create an Employee Account
You can quickly create a new employee account that grants access to all entry points within the facility.

To create an employee account,
-
Log in to the Web Portal.
-
From the top-right corner, click Add User to open the Create New User form.
User Types:
Tenant Users: This user type is only available without a PMS; otherwise, it will be grayed out and unclickable. Tenants should always be created first in the PMS and then synced into the PNSe system from the PMS.
Employee Users: Choose this option when adding managers or other employees to the facility. Employee users will be granted automatic access to all Zones within your facility.
Service/Vendor Users: Select this option to generate vendor users or users outside the tenant or employee categories. When creating a vendor user, you manually choose the specific Zones to grant access, allowing you to restrict the user's access within your facility to only the necessary locations.
- Click the Employee option, and complete the User Info form.
Note: To ensure accurate and seamless access for this employee, please provide their name, email, and phone number. The email and phone number must be unique to this employee and not duplicated or falsified. Failure to comply with this requirement may result in access issues and could impact the accuracy of your activity.
-
- Assign a role for the employee, typically a Facility or Company Manager role. Permissions a user has are determined by the Role assigned to them. For more information about Roles and Permissions, see Reviewing Permissions.
- If your facility has a keypad, you will need to assign the user an access code. This code should be a unique six-digit code to be used at entry points at the facility.
- Checking the Assign to all facilities in the company box grants access to and creates the user for all facilities within your company.
-
Click Next.
-
Click the desired schedule from the Select Schedule drop-down list, and then click Create.
Create a Vendor Account
Since vendors only require temporary access to the facility, they can be fully managed from the NSE Web Portal. You could also provide access for your vendors after hours, by creating a custom schedule.
You'll want to create vendor accounts for your maintenance workers and technicians in zones specific to their access needs.

To create a vendor account,
-
Log in to the Web Portal.
-
From the top-right corner, click Add User to open the Create New User form.
User Types:
Tenant Users: This user type is only available without a PMS; otherwise, it will be grayed out and unclickable. Tenants should always be created first in the PMS and then synced into the PNSe system from the PMS.
Employee Users: Choose this option when adding managers or other employees to the facility. Employee users will be granted automatic access to all Zones within your facility.
Service/Vendor Users: Select this option to generate vendor users or users outside the tenant or employee categories. When creating a vendor user, you manually choose the specific Zones to grant access, allowing you to restrict the user's access within your facility to only the necessary locations.
-
Click the Service/Vendor widget, and complete the User Info form.
Note: To ensure accurate and seamless access for this employee, please provide their name, email, and phone number. The email and phone number must be unique to this employee and not duplicated or falsified. Failure to comply with this requirement may result in access issues and could impact the accuracy of your activity.
-
- Assign a role for the employee, typically a Facility or Company Manager role. Permissions a user has are determined by the Role assigned to them. For more information about Roles and Permissions, see Reviewing Permissions.
- If your facility has a keypad, you will need to assign the user an access code. This code should be a unique six-digit code to be used at entry points at the facility.
- Expiration Date can be set or left blank (not a required field). If you choose to set an expiration date, the user will be automatically removed, and their access will be revoked at midnight facility time on the day of expiration. Otherwise, if no expiration date is set, the user will continue to have access indefinitely until manually deleted, at which time their access will be revoked.
- Click Next.
-
Click the desired access zone(s) from the Select Zone(s) form, and then click Create.
For more information about what Access Zones are see our Knowledge Base Article - Understanding Access Zones
Managing User Details
You can manage your user’s access from the User Details screen in the Web Portal. There are several reasons why a user is unable to access the facility. This section covers how to provide user access from the Web Portal.
Resend an Access Code to Keypads
Sometimes you might need to resend an access code for Nokē Pads, or Nokē Screens to the device to get it working properly again.
To resend a user’s access code,
-
Log in to the Web Portal.
-
Click the Users tab from the Navigation menu located on the left side of the page.
-
Click the Search field and enter the user’s last name to display his account.
-
Click a user to open the User Details form.
-
From there, click Resend Access Code to Keypads. This will resend their access code to the keypads that are in the access zone(s), once done give it a few moments to complete the action and then the tenant can attempt their access code entry again.

Reactivate an Account
When a user account is created (for both tenants and non-tenants), a unique PIN is provided to the user. This PIN serves as a security measure and is a distinctive number. Upon user creation, our system automatically assigns a unique PIN to the user, which is then sent to them via email or text message. This PIN acts as a temporary password for the user's initial login. By implementing this two-step security process, we ensure that the person accessing the account with the provided email or phone number is indeed the authorized user.
There may be instances where tenants do not receive the activation link to set up their Storage Smart Entry Mobile App accounts. In most cases, this is due to the link expiring as a result of inaction. Alternatively, if tenants sign up with an email address, the activation link may be directed to their junk mail account and accidentally deleted.
You can resend an activation link from the Web Portal. This activation link includes a new temporary 6-digit password.
To reactivate an account,
-
Log in to the Web Portal.
-
Click the Users tab from the Navigation menu located on the left side of the page.
-
Search or scroll to find the correct user.
-
Click the Quick Options (ellipsis) icon to display the pop-up menu.
-
Click the Activate Account button to resend a text message or email with the Activation Link to download the mobile app and a temporary password.
- If the user has no email or phone number, the button is grayed out.
-
After the mobile app is downloaded and opened for the first time, the user must enter his mobile phone number (or email) and the temporary password (PIN).
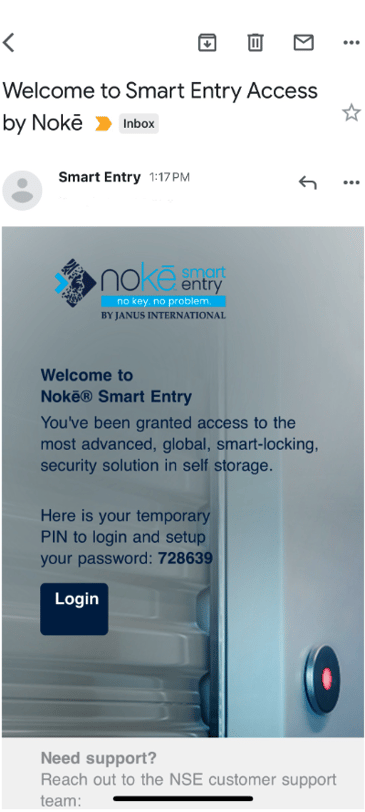
An example of how the email appears to the user once you have clicked on the Activate Account button is displayed. Notice the PIN is 728639
- The user then navigates to the NSE Web Portal or mobile app. After entering the phone or email in the Username section, the PIN that was sent in the text message is entered as the password. In this example, the PIN is 728639.

-
Upon entering the PIN, the system prompts the user to generate a new password. Once a new password is created, the user is successfully logged in. From there, the new password they created in this step will be their password to access both the Web Portal and Mobile App from then on; the PIN is only used once. After the initial login and selection of their new password, the PIN is no longer needed.