This article consolidates a wealth of information from various sources into a single, comprehensive guide about the Nokē Smart Entry system.
Nokē Smart Entry Training Manual
Welcome to the Nokē Smart Entry (NSE) system! This manual consolidates essential information to help you get up to speed with the Web Portal and Mobile App. Let's walk through the key features and settings of the system.
Chapter 1: Facility Setup and Management
- Switching to Another Facility
- Facility Settings Overview
- Roles and Permissions
- Notifications
- Setting Up Temporary Access
- Assigning Access to Multiple Facilities
Logging in to the Web Portal and Mobile App
The Web Portal and the Nokē Storage Smart Entry mobile app use the same login credentials. Facility managers and employees typically log in using their email and password. If you also have a rental unit, use your phone number to log in to the app.
Steps to Log In:
- Get Your Activation Code: This 6-digit code is sent via text or email. If you don’t have it, contact your manager.
- Log in to the Web Portal:
- Go to www.smartentry.noke.com.
- Enter your login details (email or phone).
- Enter the 6-digit activation code.
- Create a new password.
- Use the same email/phone and password for both Web Portal and Mobile App.
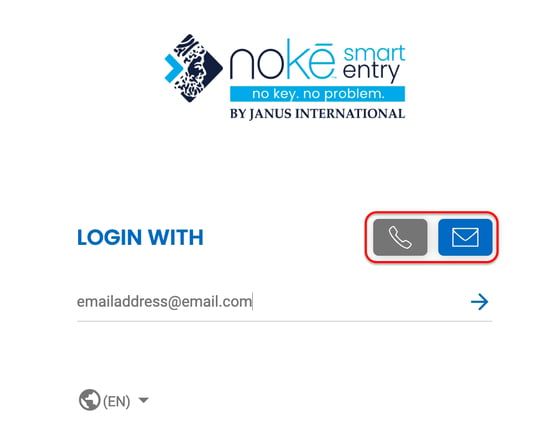
Forgotten Activation Code?
If your activation code expires (valid for 24 hours), click Forgot Password? to get a new one.
Switching to Another Facility
If you manage or work at multiple facilities, you can easily switch between them.
How to Switch:
- In the Web Portal, click Facilities.
- Select the facility you want to switch to. The page will reload to show that facility’s homepage.
Changing the Web Portal Display Theme
You can customize how the Web Portal looks by choosing from different themes.
How to Change Theme: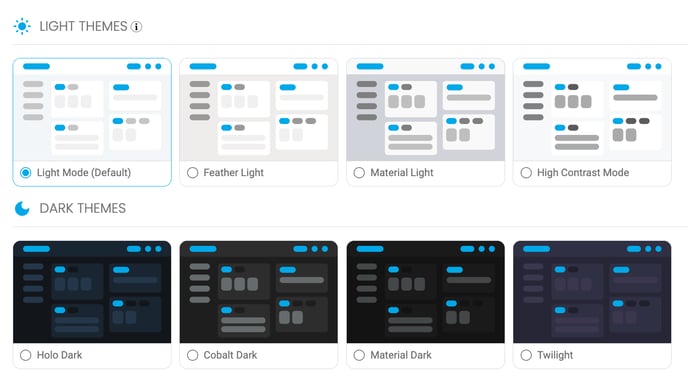
- Click Settings > Theme in the Navigation menu.
- Pick a light or dark theme (4 options each), and the portal will update automatically.
Updating Facility Settings
In the Web Portal, you can manage key settings for your facility, such as location, employee, tenant, and device settings.
Editing Facility Location:
- Go to Settings > Facility.
- Click the pencil icon to open the Edit Facility Settings form.
- Drag and drop the location marker or adjust the zoom level.
Main Facility Info:
- Facility URL: Website linked from the Web Portal (not visible to tenants).
- Payment URL: Where tenants are directed to pay their bills.
- Brand Name: Name of your facility shown in the app.
- Address: Provides directions to your facility.
- Phone/Email: Contact details visible to tenants in the app.
Time Zone & Other Settings:
- Time Zone: Set to your facility’s location for accurate access schedules.
- Language: Set your facility’s preferred language.
- Temperature Display: Shows facility temperature (Celsius/Fahrenheit). (Note: Users can change their own preferences to this and the individual user preference will override the facility setting.)
- Date Format: Choose between DD/MM/YYYY or MM/DD/YYYY. (Note: Users can change their own preferences to this and the individual user preference will override the facility setting.)
Employee Settings
Control how employees access and interact with the system.
How to Edit:
- Go to Settings > Facility > Employee Settings.
- Modify options such as:
- Offline Expiration Minutes: How long offline keys last.
- Login Expiration Time: How long a user’s session to the Web Portal remains active.
- Allow Employee Rental: Option for employees to rent units.
- Loitering Alert: Tracks idle users at the facility for more than 3 hours. Additional requirements and detailed instructions on how to configure this feature can be found in the Setting Up the Idle Users Widget article.
Tenant Settings
Adjust settings that affect tenants, like account updates and payment options.
How to Edit:
- Go to Settings > Facility > Tenant Settings.
- Key settings include:
- Sync Text: Sends onboarding text when tenant info is updated. If this setting is (OFF), the tenants will not automatically receive this text when they rent a unit. A text can still be sent to a tenant when this setting is OFF by clicking Activate Account on the Users tab in the Web Portal.
- Use Blacklist: Block access for delinquent or moved-out tenants. It is recommended to have this setting turned ON at facilities that use fobs.
- Move Out Feature: Allows tenants to request move-out via the app.
- Failed Login Alert: Sends notifications when tenants have multiple failed login attempts.
- Grace Period: Sets a time window for tenants to exit the facility after hours. Additional requirements and detailed instructions on how to configure this feature can be found in the Understanding the Grace Period for Exiting the Facility article
- Restrict Overlocked Entry: Prevents tenants with overdue units from accessing the facility unless they have at least one unit in good standing. They can only access units marked Occupied.
- Enable Dual Activation (Email): Sends activation messages to both email and phone when turned on.
-
Failed Login Alert
You can set up notifications to alert both tenants and facility managers when a tenant experiences multiple failed login attempts.
How It Works:
- If a tenant fails to log in three times in a 15-minute window, both the tenant and the facility manager will be alerted.
Example Messages:
- Tenant Message: Several failed attempts to access your account have been made. Having trouble? Click the "Forgot Password?" button in the app to reset your password.
- Site Manager Message - Text: Several failed attempts to access the account for (UNIT_NUMBER) have been made. An alert was sent to the user, along with instructions on how to proceed.
- Site Manager Message - Email: Several failed attempts to access one of your tenants' accounts (TENANT_FIRST_NAME TENANT_LAST_NAME) (UNIT_NUMBER) were just made. A similar alert was sent to the user, along with instructions on how to proceed.
Device Settings
Device settings are used to define the parameters for how the motion-sensing devices perform and report motion activity in the Web Portal. The configuration for these settings applies to all Nokē devices within the facility.
To edit the device settings:
- From the Web Portal, click Settings > Facility in the Navigation tab menu.
- In the Device Settings section, click in a field to add or edit the information as follows:
-
Motion Alert Events: The motion sensors in each unit detect thermal changes. This setting, combined with the Motion Alert Time field, determines whether a change is counted as motion. A sensor must detect the specified number of changes in a given time frame to trigger a motion event.
-
Motion Alert Time: This setting, together with the Motion Alert Events field, specifies how many changes need to be detected within a given time frame (in minutes). This defines the timeframe within which the motion events must occur.
- In other words, the number of events (motion alert events) in the number of minutes (motion alert time)
-
Temporary Code: Enable this feature to include a temporary code that grants access to all keypads within the facility for the day. The code changes daily and is displayed in a home page widget once enabled. The code refreshes every night at midnight (facility’s local time). This feature is useful for granting temporary access to maintenance workers or others requiring access. After the day ends, access is revoked. Refer to the article Creating a Temporary Access Code for full instructions.
Advanced Settings
Advanced settings define the parameters for system functionalities and are used for more advanced-level operations. The configuration of advanced settings applies to Web Portal functions within the facility.
To edit the advanced settings:
- From the Web Portal, click Settings > Facility in the Navigation tab menu.
- In the Advanced Settings section, click in a field to add or edit the information as follows:
-
Login Type: Nokē supports different login types. This setting is only applicable if your facility is configured for this feature. Choose from the dropdown list: Nokē, Okta, or AWS login types.
Note: Most facilities should be set to Nokē unless directed otherwise by a Nokē Smart Entry Support Representative.
-
Allow Service Fobs: This option allows non-tenants (e.g., contractors, maintenance workers) to use fobs for entry.
-
Hide Password Reset/Activate Account: Only for facilities with their own custom app. This setting hides the password reset and account activation options for customers using the app.
-
Zone Triggers: Enable this feature to trigger relays, alarms, or other devices when a tenant enters a designated zone (additional setup may be required).
-
Fob Schedule: This defines whether fob users adhere to one universal fob schedule or individual schedules. See Understanding 'Fobs Follow User Schedules' Facility Setting
Creating a Zone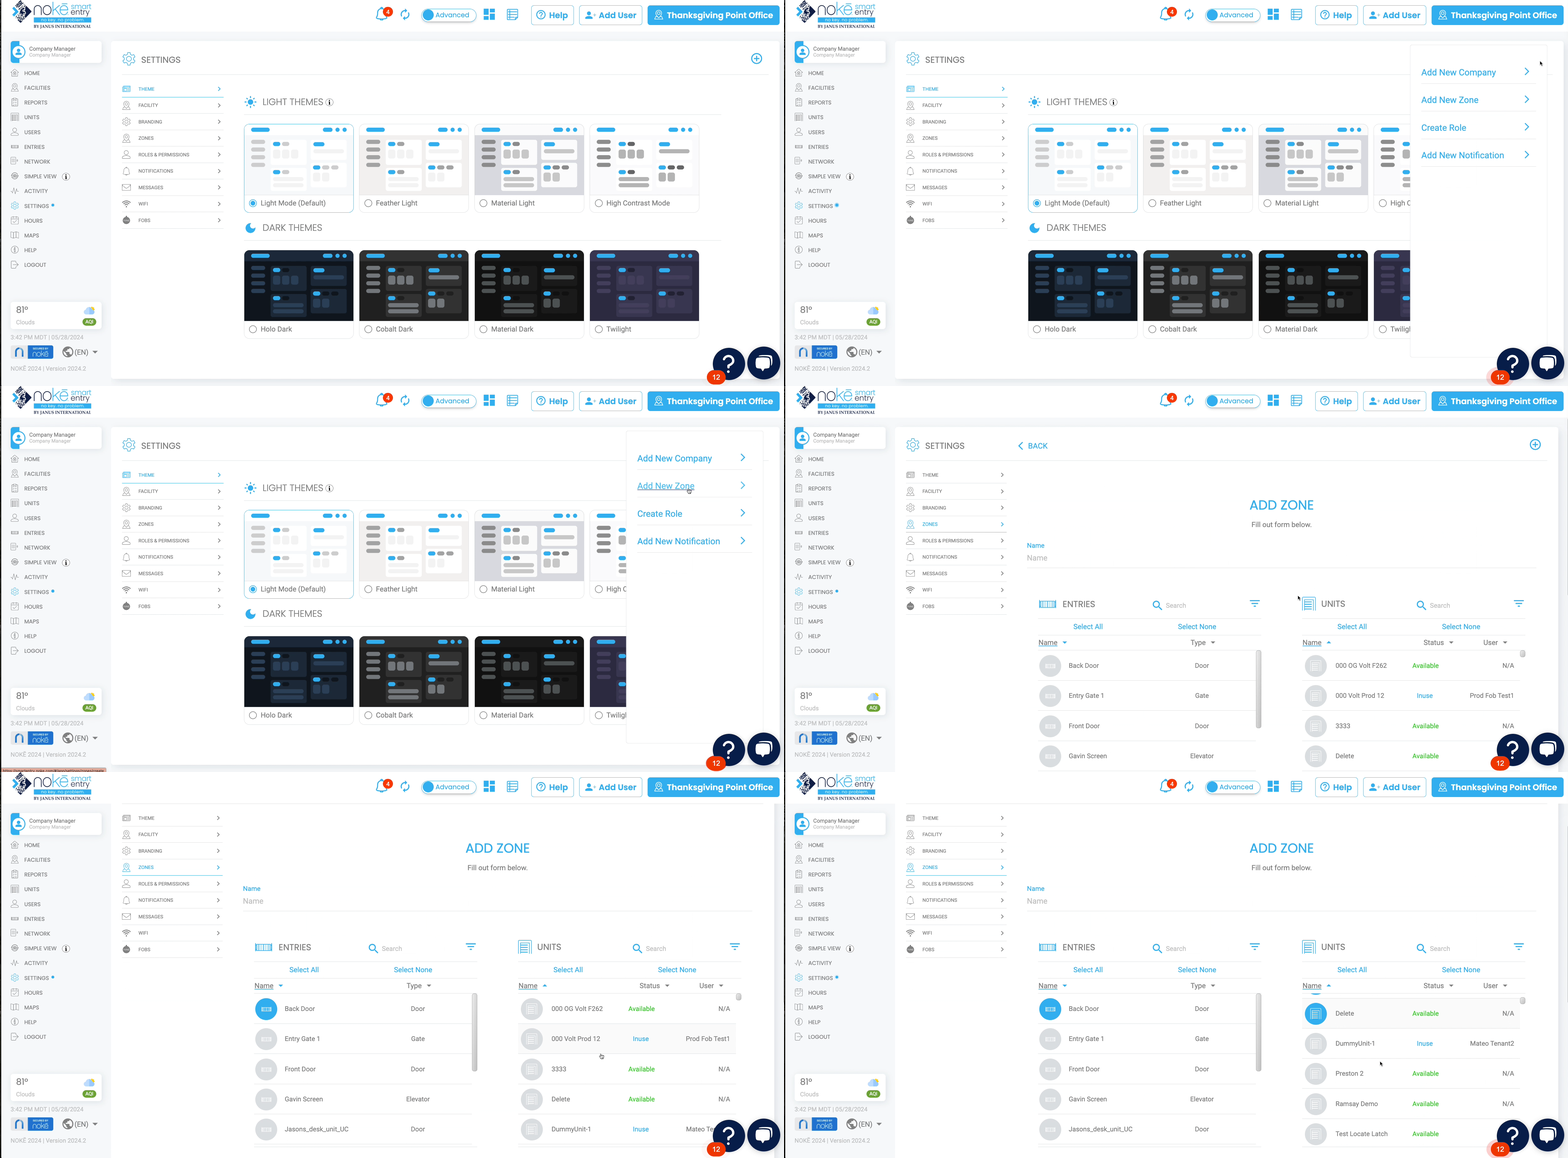
Zones allow you to grant tenants access to specific areas of your facility.
To create a zone:
- From the Web Portal, click Settings > Zones.
- In the Settings page, click the (+) sign in the top-right corner, then click Add Zone.
- In the Add Zone form, click the Name field and enter a name for the zone.
- From the Entries, Units, and Relays lists, select the elements you want to add to this zone.
- To save the new zone, click Add Zone.
For more information on zones, see:
Editing a Zone
You can add or remove entries, units, and relays from a zone at any time. However, note that making changes may temporarily disrupt access, so it is recommended to avoid editing zones unless necessary. Changes should ideally be made with assistance from Nokē Support, Account Management, and Installers to prevent any access issues.
To edit a zone:
- From the Web Portal, click Settings > Zones.
- In the Settings page, click the zone you want to edit.
- To add or remove an entry, unit, or relay from the zone, click the (pencil) icon.
- In the Edit Zone form, locate the entry, unit, or relay you want to modify. Click on its icon to either add or remove it from the zone. A gray icon indicates the item is not included in the zone.
- Click Save Changes to confirm the updates.
What are Roles and Permissions?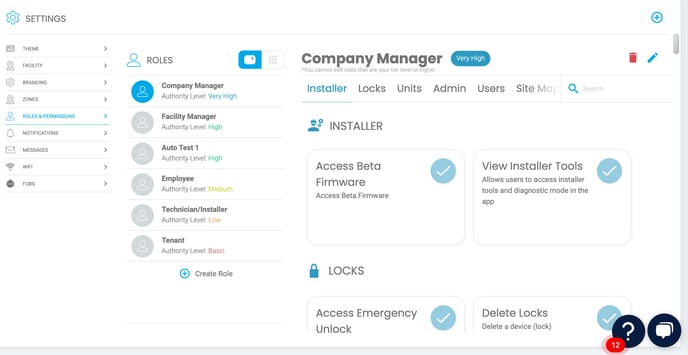
Roles and Permissions are essential for managing access and functionality within the Nokē Smart Entry system. Each user is assigned a specific role with designated permissions to ensure that only relevant information is accessible to the right users. This security feature helps protect sensitive data and prevents unauthorized access.
The Roles column on the left side of the page displays the available roles within the COMPANY. These roles are specific to the company, with the company defining the roles and permissions that apply to all its facilities.
The Nokē Smart Entry system provides default roles that are automatically created when a company is set up. These defaults can be customized to suit the unique management approach of each company, with recommendations based on typical system usage for each role.
Safety Features of Roles and Permissions
Several safety features are integrated into the Roles and Permissions structure to ensure secure and appropriate access:
-
Permission Limitations: A user cannot grant permissions that they do not already possess. If a user does not have a specific permission, it will not appear in the list of available permissions when modifying roles.
-
Role Modification Restrictions: A user cannot modify the roles of users with the same or higher authority level. For example, a Facility Manager cannot adjust the permissions of a Company Manager, but a Company Manager can modify the permissions of a Facility Manager.
-
Uneditable Tenant Role: The Tenant role is set as uneditable. This role type does not have any permissions assigned, allowing tenants to log in but restricting them from viewing any information about other tenants or employees.
Reviewing and Editing Roles
In the Nokē Smart Entry system, users can review, modify, and assign roles and permissions tailored to different employees and managers. The system comes with five default roles: Company Manager, Facility Manager, Employee, Vendor, and Tenant. These roles can be customized to fit the company’s management style, allowing users to add, remove, or edit roles and permissions as needed. The system also provides the flexibility to create new roles.
The Roles & Permissions page includes two views: Open Cards and Open Grid, both of which feature a user-friendly search function to help you locate and manage permissions for each role efficiently.

To review/edit a role:
- From the Web Portal, click Settings > Roles & Permissions.
- To switch between the Open Cards and Open Grid views, click on the respective icons. This allows for easier comparison of roles and their permissions.
- In the top-right corner, click the (+) icon to create a new role.
- To delete a role, click the Trash can icon, or to edit a role, click the Pencil icon.
Reviewing Permissions
To review the roles and their assigned permissions, click on each role listed on the left side. A checked box indicates that the permission is enabled for that role, while an unchecked box means that the permission is not assigned to that role. To edit a role, simply check or uncheck the boxes next to the permissions you want to modify.
Notifications:
Notifications can be one of the most confusing aspects of the Nokē Smart Entry system. This is partly because each person has different preferences for what they want to be notified about, what they consider 'noise,' and how they want to receive notifications. Additionally, every facility is set up uniquely, so notifications may need to be tailored to the specific devices at each location. To accommodate these varying needs, the notification system in Nokē can seem a bit complex.
The Nokē system uses notifications to inform users when something relevant occurs within the NSE system.
Notifications can be sent as text messages (SMS), emails, or push notifications, depending on the user's preferences.
Before diving into the details, it’s important to understand that notifications in the Nokē system are divided into four main types:
- Facility Notifications
- Facility-Specific Notifications
- User Account Notifications
- Unit-Specific Notifications
Each type of notification serves a different purpose, ensuring that users are informed about the activities that matter most to them, whether it’s for the entire facility or specific devices.
In the following sections, we'll break down each type and explain how they work.
Setting up User Notifications in the Web Portal
You can set up notifications and preferences for the facility, users, and individual units in the Web Portal.
To access the Notifications page:
- From the Web Portal tab menu, click 'Settings' > 'Notifications'.
Facility Notifications:
All Facility Notifications:
Notifications can be turned 'On' or 'Off' entirely at the Facility level. If this 'All Facility Notifications' setting is turned 'Off', no one at the facility (employees or tenants) will receive any notifications.

- All Facility Notifications: Set to On to enable alerts and notifications for everyone and is not recommended.
- Motion Notifications: Set to On to alert managers and tenants that someone or something is moving around within a unit.
- Motion Delay (30-60 mins): Sets the threshold for how many minutes between motion detections that the system will delay before sending a notification that motion is being sensed in the unit. (This gives a tenant time to enter and exit the unit without sending a notification.)
- Wait After Notification (5-30 mins): Sets the threshold for how many minutes the system will wait before sending another notification that motion has been sensed in the unit. (This gives managers and tenants time to respond to the motion notification.)
- Entry Notifications: Set to On to alert managers that a gate/entry has been opened.
- Unit Notifications: Set to On to alert managers that a unit has been opened.
- Manual Unlock Notifications: Set to On to alert managers that a Nokē ONE unit was unlocked via the emergency release button on the inside of the unit.
- Overlock Notifications: Set to On to alert tenants that their unit has been locked due to delinquent payment.
Facility-Specific Notifications:
Facility-Specific Notifications:
If notifications are enabled at the Facility level, each facility can manage a range of facility-specific notifications, such as entry points being opened, low battery alerts, and more. However, enabling these notifications at the facility level does not automatically mean that all users will receive them.
For example, with 'Entry Notifications', if the setting is 'On', it means, "At this facility, users can opt in to receive notifications for Entry unlocks." If the setting is 'Off', it means, "At this facility, no one will receive notifications related to Entry device unlocks." If the setting is 'Off', even if a user set their preferences for delivery method (text, email, SMS) of these types of notifications, the user would not receive any notification.

User Account Notifications:
User Account Notifications:
If notifications are enabled at the facility level and the relevant facility setting is turned 'On', each user can manage their personal notification delivery preferences. Users can choose how to be notified about activities affecting their individual accounts. Or, alternativaely, they could turn off all notifications specific to them and their account.
For example, with 'Entry Notifications', if the facility-level setting is 'On', it means, "At this facility, users can opt in to receive notifications for Entry unlocks." If the setting is 'Off', it means, "No one at this facility will receive notifications related to Entry device unlocks." Once the facility-level setting is enabled, individual users must turn 'On' their 'All User Notifications' option and select whether they want to receive the 'Entry Notifications' via Text/SMS (phone number required), Email (email address required), and/or Push Notification.

Note: To receive notifications, the user/tenant must have a valid email address or phone number on file in the NSE system.
While most people are familiar with text and email messages, push notifications may be less well-known. Push notifications are alerts that appear on your mobile device's screen, even when you're not actively using the Nokē Storage Smart Entry mobile or manager's app. Essentially, they're the standard notifications you receive from various apps on your device.
Unit Specific Notifications:
Unit-Specific Notifications:
If facility-level notifications are enabled, each user can also enable or disable notifications for individual unit controllers. These notifications are related to 'Motion Events' happening at a unit or the 'Unit Alarm' being triggered. These notifications are specific to events that are related to specific units (and turned on and off at the unit level).

Note: For unit-specific notifications to work, users must ensure that 'Motion Notifications' and/or 'Other Notifications' are enabled in both the 'Facility Notifications' section and the 'User Notifications' section.
('Unit Alarm' requires 'Other Notifications', and 'Front Motion' requires 'Motion Notifications'.)
Notification Types:
In other words, facility-wide notifications must first be enabled. Then, the corresponding option in both the 'Facility Notifications' section and the 'User Notifications' section must be turned on, and the preferred notification delivery method must be selected for those specific notification types.

The notification types are as follows:
- Motion Notifications: Alerts managers and tenants that someone or something is moving around within a unit and at what state of address it is in.
- Entry Notifications: Alerts managers that a gate/entry/unit is unlocked.
- Unit Notifications: Alerts managers that a unit has been opened.
- Manual Unlock Notifications: Set to On to alert managers that a Nokē Volt unit was unlocked via the emergency release button on the inside of the unit.
- Pending Auction Notifications: Alerts managers and district managers that a unit has been repossessed in the system.
- Low Battery Notifications: Alerts managers that a unit has a low battery.
- Gateway Offline Notifications: Alerts managers that a gateway is offline.
- Targeted Notifications: Alerts managers when a specific user is at the facility (Push notification only)(Requires additional setup).
- Other Notifications: Alerts managers to a number of things, including Overlocked (User at Facility, Unlock Attempt, or New), Alarm or Alarm Owned, Assigned Unit Note, Checkout, Duplicate Code, Failed Text, Feature, Installer at Facility, Invalid Access Code, Manager Share (Declined, Created, or Removed), Move Out, Remote Unlock (Failure or Success), Request Install Mode, Share Access, Unit Note Due, User Marked Not at Facility.
Low Battery Notifications:
There is one more type of notification. Unlike the others, this notification cannot be turned off or opted out of by the facility, making it much more straightforward. This notification is sent daily via email to the address listed in the Facility 'Settings' under 'Facility Email.' It is only sent to facilities that have Nokē One devices installed and at least one device reporting a low battery. The email will continue to be sent daily as long as there is at least one low battery unit.
The key difference between this email and the 'Low Battery Notification' we discussed earlier is that the previous notification must be enabled and configured for someone to receive it. We encountered an issue where facilities were not being notified of low battery devices, and upon investigation, it was because they had turned off notifications at the user or facility level.
Additionally, this notification is only sent to the single email address listed as the 'Facility Email' and not to all managers or employees at the facility. There is no way for a facility to opt our of this email.
For more on this feature, see out Help Center article surrounding battery replacements.
Updating When Battery Replacements Happen
Setting up Tenant/Manager Notifications in the Nokē Storage Smart Entry Mobile App:
To set up tenant/manager notifications in the mobile app:
- From the 'Home' screen, tap '
 (Settings icon)'.
 - Now tap 'Settings' from the list of options, and then click 'Notification Settings'.
- Set 'Notifications' to 'On' to receive selected notifications.
- Under Notifications select the type of unit notifications you would like to receive (SMS, Email, or Push). You can choose to receive your notifications in any one of these types, any two, or even all three if you want.
- Under Facility Messages, set to 'On' to receive Push notifications from the storage facility.
Setting Up Temporary Access Codes
Visitors who need access to your facility for a single day can be granted a temporary access code. This feature is particularly useful for auction winners, vendors, inspectors, or others needing one-time access. The temporary access code is only applicable to facilities equipped with Nokē Screens or keypads.
The temporary access code is valid for 24 hours, beginning at midnight. The Facility Manager sends the code to the visitor, granting them access for that day. Once the code expires at midnight, access is automatically revoked, eliminating the need for the manager to manually revoke it. If the visitor requires access again on another day, the manager can simply provide them with a new code for that day.
To enable temporary access codes:
- From the Web Portal, click the Settings tab.
- Click Facility.
- Scroll down to the Device Settings section, then click the Temporary Code drop-down arrow and select On.

Note: If the Temporary Code is already set to On, click Off, and then click On again to reset it.
- Click the Home tab to view the Temporary Code widget. If the widget is not displayed, you’ll need to add it to the dashboard. Once enabled, the Temporary Code widget will appear on your dashboard.

Assigning Access to Multiple Facilities
If your organization has multiple facilities using the Nokē Smart Entry system, you can assign your managers and employees access to a group of these facilities.
To grant employees access to multiple facilities:
- From the Web Portal, click the Users tab.
- From the list of available users, click on the user you want to assign additional facilities to.

- In the User form, click the gear icon in the top-right corner to edit the user.

- From the Edit User form, click the Facilities tab.

- From the list of available facilities, select the additional facilities you want to assign to the user, and then click Save Changes.
Note: Facilities that are greyed out are ones that the user does not have access to. Once a facility icon is colored, it indicates that the user now has access to that facility.
Chapter 2: Facility Users
This section shows you how to perform the following tasks:
- Creating a Non-Tenant User
- Creating an Employee Account
- Creating a Vendor Account
- Deleting an Employee/Vendor User
- Granting 24-Hour Access
- Working with Schedules and Checking Access
- One User - Assign Schedule
- Editing Schedules
Creating Non-Tenant Users
Non-tenant users, such as employees, vendors, and maintenance workers, play an essential role in facility operations. These accounts are not managed through the property management system (PMS) and must be created directly in the Nokē Smart Entry (NSE) Web Portal.
This article explains how to create employee and vendor accounts to grant the appropriate level of access.
Creating an Employee Account
Employee accounts are designed to give staff full access to facility entry points.
Steps to Create an Employee Account
- Log in to the Web Portal.
- In the top-right corner, click Add User to open the Create New User form.
- Select the Employee option.

- Complete the User Info form:
- Optional: Check the box for Assign to all facilities in the company if the employee needs access to multiple locations.
- Choose a Schedule from the available options.
- Click Create.
Once created, the employee receives a text message with a link to download the app and a verification code to activate their account.
Creating a Vendor Account
Vendor accounts are designed for temporary access, typically used by maintenance workers, technicians, or delivery personnel. These accounts can be customized with specific schedules and expiration dates for added security.
Steps to Create a Vendor Account
- Log in to the Web Portal.
- In the top-right corner, click Add User to open the Create New User form.
- Select the Service/Vendor option.

- Complete the User Info form and click Next.
- Select an Expiration Date from the pop-up calendar to limit access.
- Choose the required Access Zone(s) to define where the vendor can enter.
- Click Create.
Deleting an Employee/Vendor User
Occasionally, you will need to delete an employee account from the Nokē Smart Entry system.
To delete an account,
-
From the Web Portal, click the Users tab.
-
From the list of available users, click the user that needs to be deleted.
-
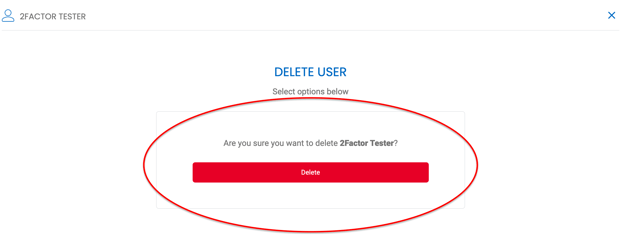
From the User details page, click the (trash) icon in the top-right corner.

-
Click Delete to confirm the deletion and remove the user and all access from your facility.
Granting 24-Hour Access
The 24/7 Schedule allows specific users unrestricted, round-the-clock access. By default, a user's gate access follows your facility’s Default Gate Hours, but this can be overridden for users who require 24-hour entry.
Key Considerations
- Non-Tenant Accounts: Use the Nokē Smart Entry system to assign schedules for non-tenant accounts, such as employees or vendors.
Steps to Grant 24-Hour Access
-
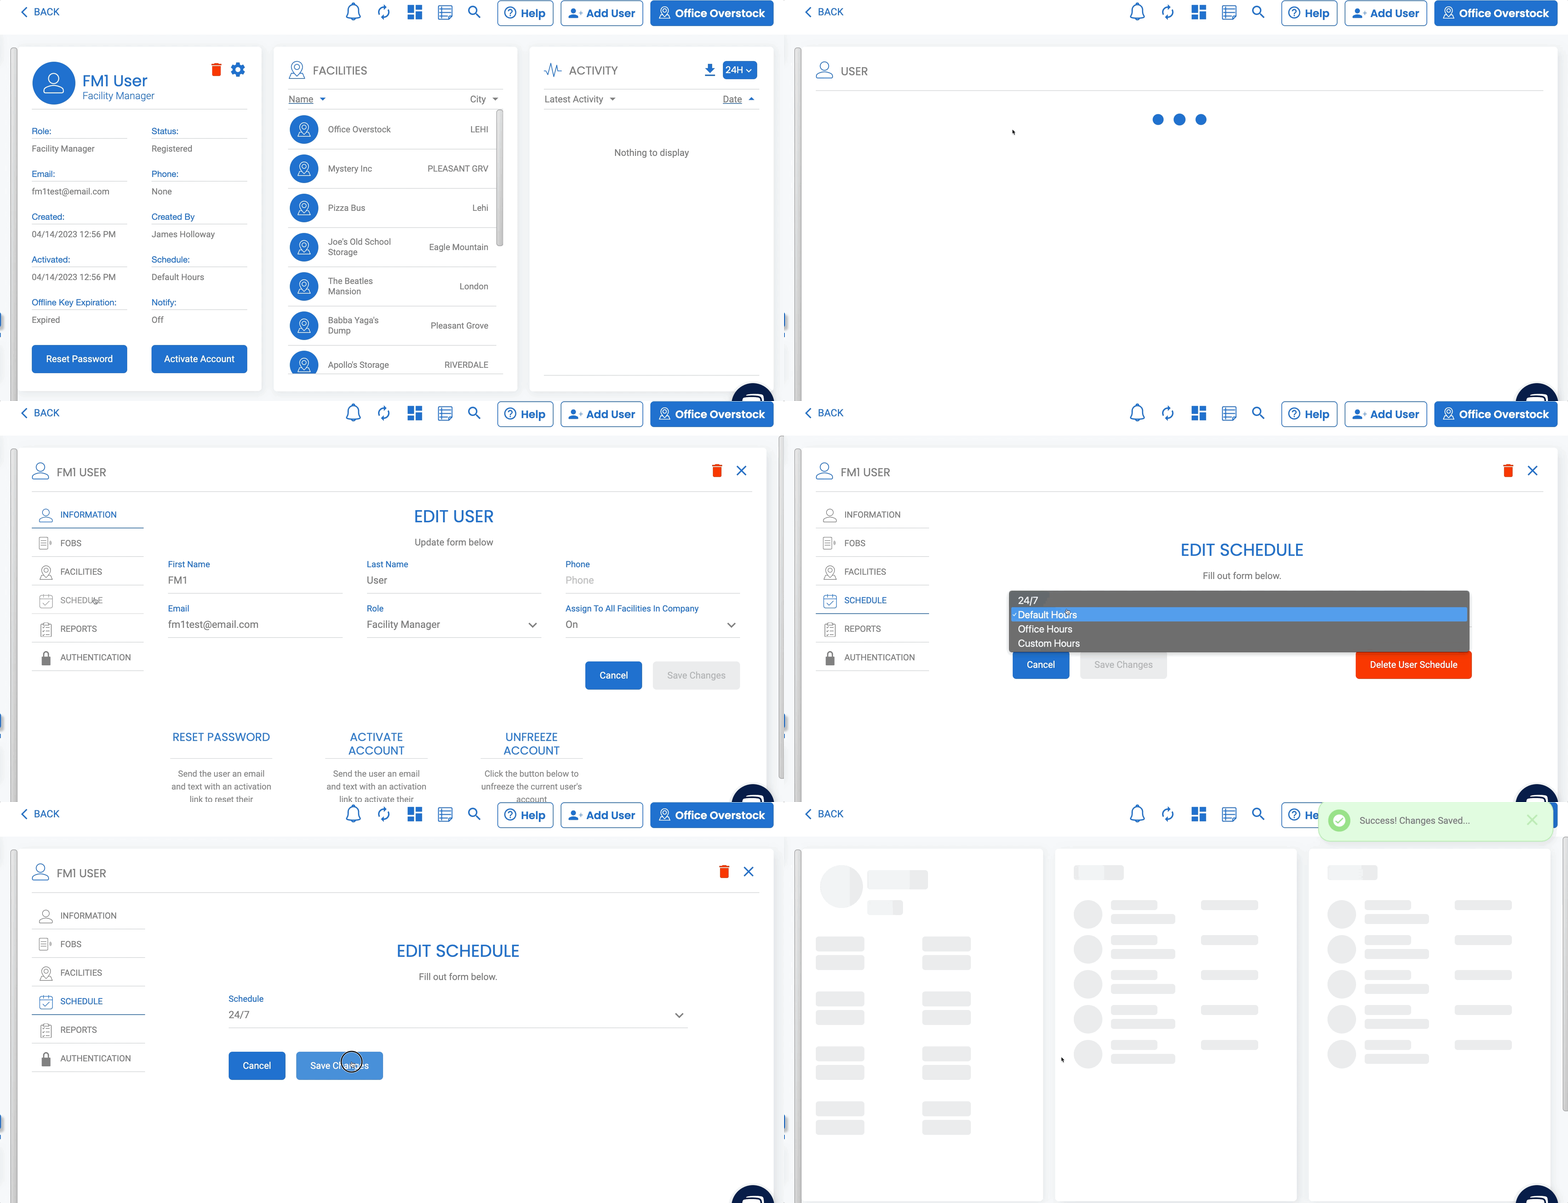
Navigate to the Users Tab:
- Log into the Web Portal and select the Users tab from the left-hand menu.
-
Locate the User:
- Use the search or scroll function to find the user whose access you want to modify.
-
Assign the 24/7 Schedule:
- In the Schedule column, click the dropdown menu.
- Select the 24/7 Schedule option.
-
Save Changes:
- Click Save Changes to apply the new schedule.
Summary
By following these steps, you can grant unrestricted access to designated users, ensuring they have entry privileges beyond the facility’s default gate hours.
Setting Up Facility Hours/Schedules
The Hours tab in the Nokē Smart Entry Web Portal allows you to define and manage the schedules for facility access. This feature is essential for organizing when tenants, employees, or vendors can access the facility, depending on their roles and needs.
Reviewing Access Schedules
-
Navigate to the Hours Tab:
-
Log into the Web Portal and locate the Hours tab on the left-hand side of the screen.
-
This tab lists all available schedules for your facility.

Note: The layout of the Hours page may vary depending on your facility's configuration.
-
-
Schedule Types:
-
Default Schedule:
Automatically assigned to new users. This is the primary schedule for your facility. -
Office Schedule:
Not necessarily your office's operating hours. Use this schedule to limit access to specific times, such as for auction winners or clients needing supervision during business hours. -
Custom Schedule:
A flexible schedule designed for unique requirements, such as vendors responsible for specific tasks (e.g., trash collection or landscaping). -
24-Hour Schedule:
Fixed for individuals who require unrestricted, round-the-clock access, such as employees or business tenants. This schedule cannot be modified. -
Fob Schedule:
Defines the access times for users with fobs.
Note: This only applies if the "Fobs Follow User Schedule" facility setting is 'Off'. For more information about how this works, see 'Understanding Fobs Follow User Schedule' Facility Setting.
-
Assigning Schedules to Individual Users
-
Navigate to the Users Tab:
- Log into the Web Portal and select the Users tab.
-
Assign a Schedule:
- Locate the user whose schedule you want to edit.
- Use the dropdown menu to assign the desired schedule to the user.

Editing Schedules
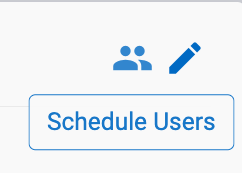
- Click the (pencil) icon in the right corner of each schedule to edit the open and close times.


- Click the (people) icon in the right corner to edit the users in this specific schedule.
-
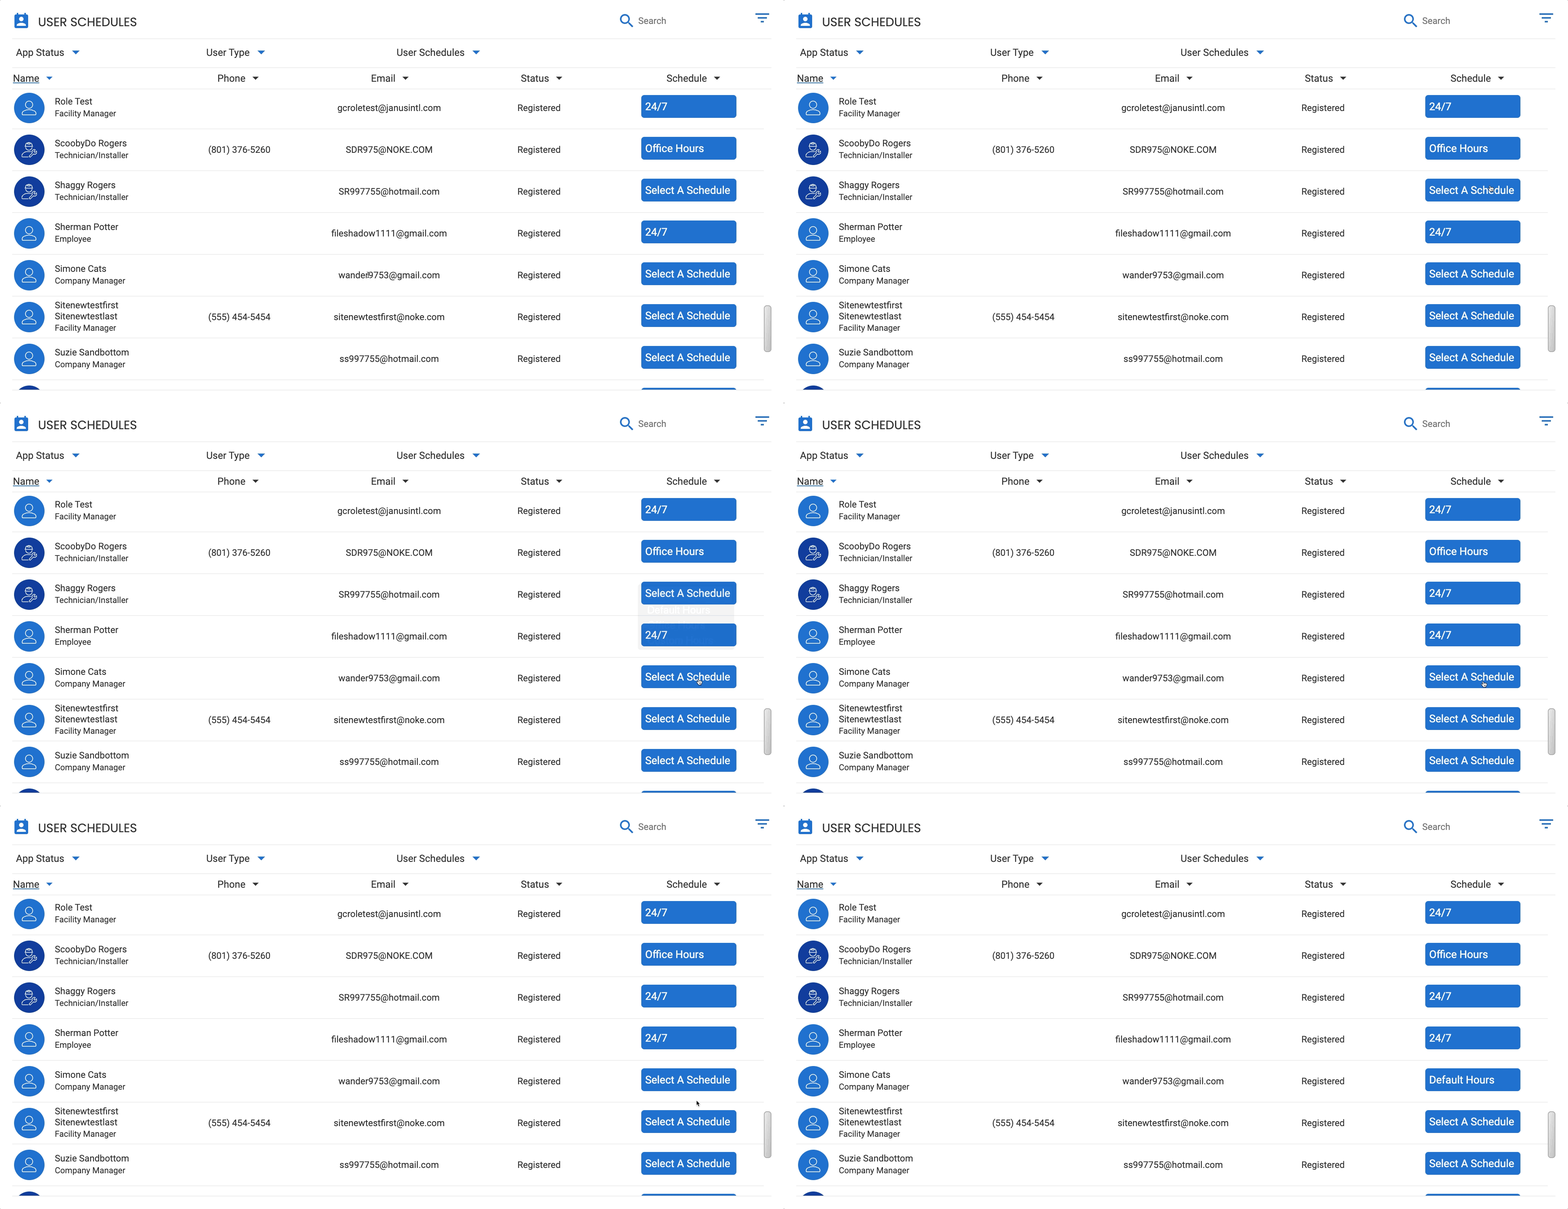
A pop-up form lets you view all the users that are currently assigned to this schedule.

-
Click the Edit Users button to go to a page where you can assign users to the different available schedules.
-
Understanding Digital Keys
Digital keys are a key component of the Nokē Smart Entry system, enabling seamless access to facilities while maintaining security. Here’s an overview of how offline and digital keys work, and how they help ensure smooth access for users:
How Digital Keys Work
-
Security Checks:
When a user arrives at your facility, the system performs several critical checks:- Location Check: Verifies the user's presence at the facility.
- Rental Status Check: Ensures the user is not in a delinquent status.
- Schedule Check: Confirms that the user is within their assigned access time.

-
Issuing the Digital Key:
After these checks are successfully completed, the system issues a digital key to the user. This key authorizes access to the facility and its devices. -
Offline Key:
Once the key is authenticated, it is downloaded to the user's mobile phone. This eliminates the need for continuous Wi-Fi or cellular service to access the facility, especially in areas with limited connectivity. This downloaded key is called an offline key. -
Access Without Connectivity:
The offline key ensures users can still access their units even if they are in areas with poor connectivity. If an offline key is available, it will always be used by the phone to unlock the device.
If no offline key is present, the phone will attempt an online unlock, using Wi-Fi or cellular service to verify the user’s credentials. Once verified, access is granted.
Seamless Experience
-
Background Process:
All these checks and key downloads happen automatically and seamlessly in the Nokē Smart Entry backend, ensuring a quick and smooth access experience. -
No User Notification:
Users are not notified whether they are using an online or offline key, ensuring a smooth and uninterrupted experience.
Potential Issues with Connectivity
-
Gate Access Issues:
When a tenant arrives at the facility and opens their app at the gate (where connectivity is typically reliable), everything works fine. However, if a tenant tailgates in without opening the app or if the facility gate is left open, the tenant may encounter issues accessing their unit in areas with poor connectivity. -
Resolving Connectivity Issues:
In these cases, the user can download a new key by logging into the app while on-site or by initiating an entry with the app. A Wi-Fi or cellular connection is required for this process, and once done, a new key will be automatically downloaded if the user is authorized for access.
Expiry of Digital Keys
-
Daily Expiry:
Digital keys remain valid only until the end of the day. At the start of the next day, they expire and will require a fresh security check. This ensures that the system can verify the user's status and access permissions each day. -
Account Changes:
If there are any changes to the user’s account (e.g., schedule or access privileges), new digital keys will be issued as needed.
Verifying Digital Key Status
Facility managers or employees can check whether a user has an Active or Expired offline key via the Web Portal. For detailed instructions on how to perform this check, please refer to the guide titled Verifying a User has an Active Digital Key.
Summary
Digital keys offer a convenient, secure, and flexible way to access Nokē devices and facilities. With the ability to function offline and automatically refresh daily, the system ensures seamless access even in areas with limited connectivity.
Verifying a User Has an Active Digital Key
When a user first arrives on-site and is signing in to the mobile app with his credentials, his device is checking in with the Nokē system. Upon this check-in, a security verification is performed which is asking the Nokē Smart Entry system:
- Who is this user?
- What unit(s) are rented?
- Is the tenant paid current?
- Is the tenant here during his scheduled access hours?
- Is the device on-site, etc.?
To see if a user has an active key or if his key is expired, navigate in the Web Portal to the Users tab and then select the specific user. On this page, you will see a field called Offline Key Expiration.
Here is an example of a key that is expired:

Here is an example of a key that is currently active:

If the Offline Key Expiration is Expired, then the user needs to download a new key. He can do this by simply logging into the Storage Smart Entry by Nokē app while on-site or by opening an entry with the app. In both cases, he needs to have cell phone service or be connected to Wi-Fi. By doing that, a new key is automatically downloaded (if the user should have access).
If this does not work, try to log out and back into the app, and then unlock an entry while connected to Wi-Fi or with cellphone service.
Chapter 3: Facility Units
This section shows you how to perform the following tasks:
Explaining Unit Status
Explanation of the various Unit Status selections and their implications on tenant access.
-
Occupied: This status provides access to the tenant and any shared access users.
-
Available: This status provides access to only the employees of the facility.
-
Overlock: This status denies access to all employees and the tenant.
-
Pending Auction: This status provides access for either employees or the auction winner. (See more information about Auctioning a Unit)
-
Gatelocked: This status indicates that the tenant is locked out of the facility.
-
Pre-Let: This is an agreement between a landlord and a prospective tenant to enter into a lease at a date in the future.
Vacating a Unit
You always move your tenants out via your PMS--not from the NSE Web Portal or mobile application.
To move out a tenant,
1. Perform the move out from your PMS, and then do the following:
-
If you are a GDS, Space Manager, Easy Storage Solutions, or storEDGE unattended user, the tenant will no longer have access to the unit as soon as the move-out is processed in your PMS.
-
If you are a storEDGE, Sitelink, or Omni user, log into your organization’s PMS web portal and click Sync PMS.
How to Transfer Units in the NSE Web Portal
It’s common for tenants to outgrow or downsize their storage needs. To make this transition seamless, the Nokē Smart Entry (NSE) Web Portal allows tenants temporary access to two units during a transfer. This ensures they have adequate time to move belongings from one unit to another.
Overview of the Transfer Process
The transfer process involves two key steps:
-
Update the Property Management System (PMS):
- The transfer must first be processed in the PMS system. This step handles account updates, charges/credits, and the creation of a new lease agreement.
-
Grant Temporary Unit Access in the NSE Web Portal:
- After the PMS update, the Web Portal assigns the tenant temporary access to both the vacating and new units for 48 hours, ensuring smooth movement between zones or areas.
Step-by-Step Guide to Transferring Units
-
Process the Transfer in the PMS System
- Complete the transfer in the PMS, including updating the tenant’s unit assignment and syncing with the NSE system.
-
Initiate the Transfer in the NSE Web Portal
- Log into the NSE Web Portal and navigate to the Units tab.
- Locate the vacating unit and click on it to open the Unit Details page.
- Click Transfer Unit.
- In the Transfer Unit form, select the new unit to which the tenant is moving.
- Click Submit to grant the tenant temporary access to both units.
Key Details During the Transfer
- Default Access Period: The tenant will have access to both units for 48 hours.
- Cancelling the Transfer: You can manually cancel the transfer by selecting the vacating unit in the Unit Details page and clicking Unassign from Transfer.
- Extending the Transfer: Use the Extend Transfer option in the Web Portal to reset the 48-hour access period.
Syncing with PMS
After 48 hours (or once the transfer is completed):
- The NSE Web Portal syncs with the PMS system.
- The vacated unit becomes Available for rent.
- The new unit becomes Occupied by the tenant.
Special Considerations
-
Shared Users and Managers:
- Shared users and managers retain access to the vacating unit during the 48-hour transfer period. However, once the tenant occupies the new unit, shared access must be re-established via the mobile app.
-
Fob Users:
- Fob users can access the vacating unit during the transfer period. After the transfer, the fob must be resynced to access the new unit.
-
PMS Overrides:
- Any changes made in the PMS system during the transfer are ignored by the NSE system until the transfer period ends or is canceled.
Example Scenario
Tenant Scenario:
- The tenant currently rents Unit A but is moving to Unit B.
Manager Actions:
- Process the transfer in the PMS, including payment adjustments and a new lease.
- Sync the PMS with the NSE system to reflect the tenant’s move to Unit B.
- In the Web Portal, go to the Units tab.
- Locates Unit B and clicks on it. (New)
- From the unit details page, select Transfer Unit.
- In the bottom section, select Unit A. (Old)
Transfer State:
- The tenant now has access to both Unit A and Unit B for 48 hours.
- For 48 hours, we are bypassing or ignoring any PMS updates and syncs.
- After 48 hours, the NSE Web Portal syncs with the PMS system, making Unit A available for rent and marking Unit B as occupied.
Pro Tip
Add the Users Transferring widget to your Web Portal dashboard to track active transfers and monitor expiration times.
Chapter 4: Tenant Setup and Tenant App
This section shows you how to perform the following tasks:
- Setting Up the Mobile App
- Moving In a Tenant
- Opening a Unit as a Tenant
- Opening an Entry Point as a Tenant
- Helping Tenant Find Unit
- Making a Payment
- Sharing a Digital Key
Setting Up the Mobile App
Once you have downloaded the Nokē Storage Smart Entry mobile app, you will need to log in and set up your account.
To set up an account,- From the Login screen on the mobile app, enter your smartphone number in the field, and then enter the verification code that was sent with the text in the password field.
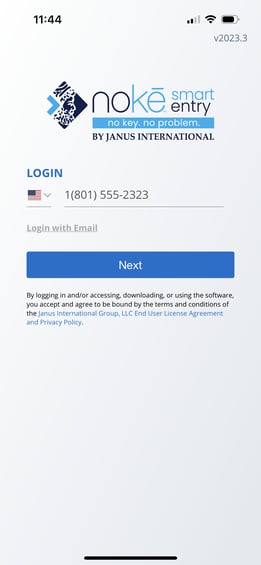
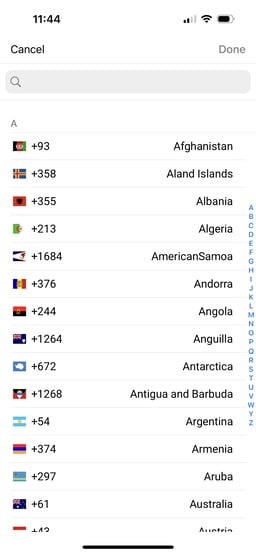
- Click the Login with Email link at the bottom of the screen to use your email address as your login. If your phone number has a different country code than your facility, click the Country Code drop-down and select it from the list. (The default country code is based on the facility’s location.)
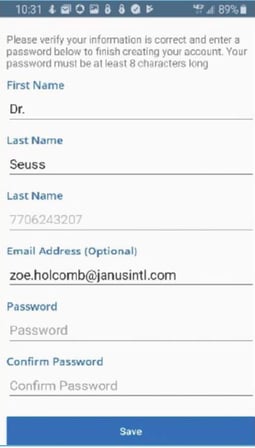
- Next, you will be prompted to create and confirm a new password (minimum of 8 characters).
- Now you can log in to the mobile app and Web Portal with the new password you just created.
Moving In a Tenant
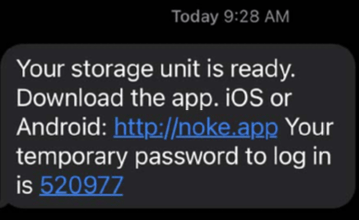
Once the rental is processed in your PMS, your tenant receives a text message and an activation code (temporary password) with a link to download the Nokē Storage Smart Entry mobile app.
Note: The tenant’s mobile phone number is required if she wants to use the mobile app to access her unit.
If the tenant does not receive the text, check the following:
-
From the Web Portal, click the Users tab, and then locate the tenant using the Search field. Click the tenant’s account, and then click Activate Account to resend the link.
-
If the tenant still does not receive the text, the phone number for the tenant is probably incorrect in your PMS.
-
Update the phone number in your PMS, and then follow the steps below:
-
Sitelink, Omni, and storEDGE users: You’ll need to go to your branded web portal and log in, and click Sync PMS in order for the rented unit to update the NSE system.
-
StorEDGE (unattended), Easy Storage Solutions, and Space Manager users: This update occurs automatically. The customer should receive a text within one minute of processing the rental in your PMS.
-
Storelocal GDS users: The update between the PMS and the Nokē system occurs automatically, and the text is delivered automatically via GDS. If you process the rental through GDS, the tenant immediately receives a text. If you process the rental through your management software, it can take up to 5 minutes for the text to be sent. Transferring units, move-outs, and status changes can take up to 5 minutes to process.
-
To log in to the tenant mobile app,
-
From the text message, tap the link to download the mobile app.
-
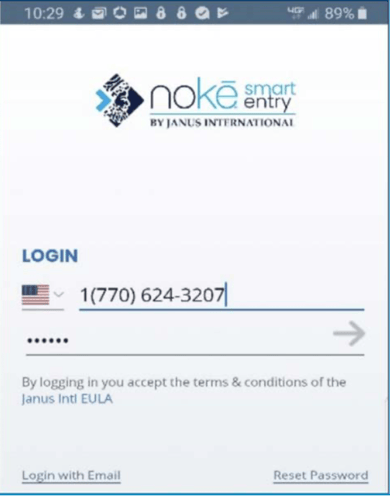
Once the mobile app is downloaded, enter your mobile phone number in the Login field, and enter the 6-digit activation code in the Password field.
-
If you want to log in with your email address instead of your phone number, tap the Login with Email link at the bottom of the screen. (For tenants that are employees too, this is a good way to set up your employee account.
Opening a Unit as a Tenant
To access your unit with the Nokē Storage Smart Entry mobile app, follow the steps below. The app can be downloaded from either the Apple App Store or the Google Play Store by searching for Storage Smart Entry by Nokē.
First Steps for New Tenants
-
Download the Mobile App:
- Go to the Apple App Store (for iPhone) or Google Play Store (for Android) and search for Storage Smart Entry by Nokē to download the app.

- Go to the Apple App Store (for iPhone) or Google Play Store (for Android) and search for Storage Smart Entry by Nokē to download the app.
-
Activate Your Account:
- After renting the unit, you’ll receive an automated text message from the facility.
- Use your phone number as your username.
- Enter the 6-digit PIN (activation code) provided in the text message as your temporary password.
-
Create a New Password:
- Once logged in, the app will prompt you to create a new password for future logins.
-
Grant Necessary Permissions:
- The app will request permission to access Bluetooth and Location Services on your smartphone.

- Ensure Bluetooth is turned on in your phone's settings, and grant the app permission to access it in order to unlock your unit.
- The app will request permission to access Bluetooth and Location Services on your smartphone.
Using the App to Access Your Unit
-
Home Screen Overview:
- After logging in, the Home screen of the app will display essential facility details, including the name, address, and phone number.
- A list of entry points, units, and devices you have access to will be shown.
-
Open the Facility Gate:
- When you arrive at the facility's entry gate, the gate icon will be highlighted on the app’s Home screen.
- Tap the highlighted icon to open the gate.
-
Access Your Unit:
- Once you reach your unit or are within range, the unit icon will be highlighted in the Home screen.
- Tap the highlighted icon to unlock your unit.
-
Unlocking Specific Units (Nokē One or Nokē Contact):
-
For Nokē One or Nokē Contact units, you’ll need to wake the lock first:
- Touch the button on the device to wake it up.
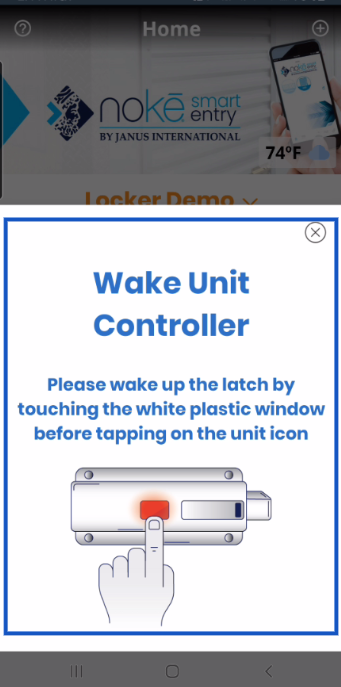
- The icon will highlight in your app, allowing you to unlock the unit.
- Touch the button on the device to wake it up.
-
If the unit is in sleep mode, the app will automatically detect this and prompt you to wake it up before unlocking.
-
-
Out-of-Range Devices:
- If the device is grayed out and does not highlight, it means you are out of range.
- Simply move closer to the device, and once you are within range, the app will verify your access and unlock the device.
Opening an Entry Point as a Tenant
To open an entry point using the Nokē Storage Smart Entry mobile app, follow the steps below. The app can be downloaded from the Apple App Store or the Google Play Store by searching for Storage Smart Entry by Nokē.
First Steps for New Tenants
-
Download the Mobile App:
- Go to the Apple App Store (for iPhone) or Google Play Store (for Android) and search for Storage Smart Entry by Nokē to download the app.

- Go to the Apple App Store (for iPhone) or Google Play Store (for Android) and search for Storage Smart Entry by Nokē to download the app.
-
Activate Your Account:
- Shortly after renting your unit, you will receive an automated text message from the facility.
- Use your phone number as your username.
- Enter the 6-digit PIN (activation code) provided in the text message as your temporary password.
-
Create a New Password:
- Once logged in, the app will prompt you to create a new password for future logins.
-
Grant Necessary Permissions:
- The app will request permission to access Bluetooth and Location Services on your smartphone.

- Ensure Bluetooth is turned on in your phone's settings, and grant the app permission to access it to unlock the entry point.
- The app will request permission to access Bluetooth and Location Services on your smartphone.
Using the App to Open Entry Points
-
Home Screen Overview:
- After logging in, the Home screen of the app will display essential facility details such as the facility's name, address, and phone number.
- Below that, you will find a list of all entry points, units, and devices you have access to.
-
Opening the Facility Gate:
- Upon arrival at the facility's entry gate, the gate icon will be highlighted on the app’s Home screen.
- Simply tap the highlighted icon to open the gate.
-
Accessing Devices:
- If any device is grayed out and is not highlighted, it means the device is out of range. Move closer to the device, and once you are in range, the app will verify your access and unlock the device.

- If any device is grayed out and is not highlighted, it means the device is out of range. Move closer to the device, and once you are in range, the app will verify your access and unlock the device.
-
Using Nokē Pad, Keyless Entry, or Nokē Screen:
- For gates, doors, or elevators with assigned access codes, use the access code number directly on the device.
- After entering the code, tap the # (e.g., 123456#).
- Once the access is verified, a green light (if applicable) will appear, and the device will open.
By following these steps, you can easily open any entry point within the facility using the Nokē Storage Smart Entry mobile app. Ensure your Bluetooth is on, and permissions are granted to access the necessary devices.
Helping Tenant Find Their Unit
When using the tenant's mobile app, the Locate Unit feature can be found on the Home screen. By tapping the Locate Unit icon, the smart lock will emit a chirping sound for 15 seconds, while the unit controller flashes blue to pinpoint the source of the noise. If the tenant has multiple units, a menu will allow them to choose the specific unit to locate and unlock when near the door.

This innovative feature is ideal for tenants who have rented a unit online and are exploring the property for the first time, or for tenants who haven't visited their space in a while and may have trouble recalling its location.
Note: This feature is particularly useful for digital key shared users who are new to the facility and unit. These users can easily download the mobile app, log in for access, and find the exact location by checking the address below the facility name. This will then open the map app to guide them to your facility.
Once the shared user arrives at the facility, they can utilize the Locate Unit feature to easily find and access the tenant's unit. This feature is a valuable tool for various shared users, including movers, business employees, friends, and family members. It showcases how your facility leverages smart technology to enhance the overall tenant experience.
Making a Payment
If a tenant is delinquent on a payment and the unit is placed in the Overlocked status, a message is sent to her when she tries to access the facility. It states that a payment is required and to tap the Make Payment button in the tenant's mobile app. This links to the facility's payment portal.
To make a payment from the mobile app,
-
When the tenant receives the Overlocked text message, she is directed to tap the Make Payment button in the mobile app.
-
This redirects her to your facility's PMS payment portal where a payment is made.
-
Once the payment is completed, the tenant returns to the tenant mobile app where access to her unit is restored.
Note: It could take up to 5 minutes before the tenant can access the facility’s gate or her unit.
Sharing a Digital Key
Tenants have the flexibility to grant access to their units to an unlimited number of guests using our Nokē Smart Entry digital key technology. With just a few taps on their phone, tenants can easily revoke shared digital keys and effortlessly keep track of who accessed their unit and when.
To share a tenant's digital key from the mobile app,
- Log in to the Nokē Storage Smart Entry mobile app.
- Click Share Access in the top-right corner of the screen.
- Enter the smartphone number of the person you want to share access with your unit.
- Click Next.
- Select the unit(s) to share access with, and then click Next.
- Select the time frame, if the shared user should have temporary access only. Otherwise, select to share indefinitely.
- Now, the shared user receives a text message with an activation link to download the mobile app and a temporary 6-digit password to log in.
To enable the shared user's access to the unit,
- The shared user clicks the link and downloads the Storage Smart Entry by Nokē mobile app.
- From the Login screen, the user enters his smartphone number and then clicks Next.
- From the Enter Code screen, the user enters the 6-digit password and then clicks Next.
- From the Confirm Account screen, the user is prompted to enter a first and last name, and then to create and confirm a new password (minimum 8 characters).
- To complete the setup, the user clicks Confirm Account.
- An introduction to the Storage Smart Entry mobile app is displayed with a short tutorial.
Tenant Talking Points
- Tenants can share digital key access to their unit(s) from their Nokē Storage Smart Entry mobile app with anyone at any time for a specified number of days or indefinitely.
- Shared Users can be added with ease via a smartphone number.
- Shared Users can be deleted with a swipe of the finger.
- Only tenants can manage their Shared Users--the users cannot.
- Tenants can monitor all unit activity right from their mobile app and filter by unit and user.
- Unit access can also be shared with the facility employees to grant temporary entry for package delivery or to perform maintenance.
- Digital key access and the Shared User feature is great for movers, friends, family, and employees.
To receive a digital key,
-
From the text message, click the link to download the mobile app.
-
Once the mobile app is downloaded, the user enters her mobile phone number in the Login field, and then enters the 6-digit verification code in the Password field.
-
The shared user is prompted to create a new password containing at least 8 characters.
To revoke a digital key,
-
Tap the Users icon at the bottom of the screen.
-
From the Users screen list, swipe left on the shared user.
-
Tap Delete.
-
Tap Yes to confirm.
Chapter 5: Fobs
This section shows you how to perform the following tasks:
Initial Setup - For Managers Assisting Tenants
To initiate the setup process,
- Log in to your manager's mobile app account.
- Refresh your app by pulling down from the top, this verifies that you have the most up-to-date information units/accounts before proceeding
- Tap the '+' (plus) symbol in the top right corner of the mobile app.
- Select the Add Fob to Tenant option.
- Scroll or search to find the tenant you are assisting and tap on the user name.
- Obtain the PIN sent to the tenant and enter it on the Enter PIN page. Click Next. (Note: The tenant must provide the PIN as the fob is a shared user and requires access.)
- Give the fob a quick squeeze to initiate the search process. (Note: Do not hold the fob, just give it a quick squeeze and release.)
- Follow the prompts in the mobile app to complete the fob setup.
Note: The 'Fobs Follow User Schedule' is a new facility setting that allows you to determine whether users with fobs will adhere to a universal Fob Schedule (set on the Hours page of the Nokē Smart Entry Web Portal) or if each user with a fob will follow an individual schedule assigned to them. If this Facility Setting is turned 'On', upon the next sync or addition of a new fob, firmware updates will be mandatory for most fobs to enable the individual user schedule feature. Fob firmware versions 3.7 or lower do not support this feature and can only utilize the Fob Schedule. The Mobile App will guide you through the fob firmware update process. However, this is a 2 step process where you must first update the firmware, and then once that is complete, you sync the fob again to complete the process.
If the 'Fobs Follow User Schedule' facility setting is enabled and you are adding a fob for the first time, if the fob has firmware version 3.7 or lower, this process will now involve three steps. Initially, you must add the fob to the tenant, followed by updating the firmware, and finally, syncing the fob again to finalize the process.
Note: To sync or add Fobs, ensure that your Mobile App is updated to the latest version (2024.1). If you encounter any issues, the first troubleshooting step is to check the version number of the Mobile App. You can locate this information within the Mobile App by accessing Settings (identified by the three horizontal lines icon in the bottom right corner) and selecting 'About'.
If the Mobile App is not on version 2024.1 or later, it will need to be updated. Tenants can do this by navigating to either the Google Play Store or the App Store and searching for the 'Storage Smart Entry by Nokē' app. If an update is available, it will be displayed, and tenants can proceed to update the app.
For Android devices, after adding a new fob, you will need to sync it. The Mobile App will prompt you to do so if the 'Fobs Follow User Schedule' setting is turned 'Off'.
If a user already has a fob but encounters issues with its functionality for entry(s) or unit(s), or if any changes have been made to her account, it might be necessary to sync the fob to update its programming.
Some sync changes have been implemented depending on whether your facility wants the fobs in use to follow one universal fob schedule or if each user with a fob will follow an individual schedule assigned to them.
See that KB here: 'Fobs Follow User Schedule' Facility Setting
To initiate the synchronization process,
- Log in to your manager's mobile app account.
- Refresh your app by pulling down from the top, this verifies that you have the most up-to-date information units/accounts before proceeding
- Tap on the Settings menu in the bottom right corner (represented by three horizontal lines).
- Select Sync Fob for Tenant.
- Ensure that the fob is within range of your device, Give the fob a quick squeeze to initiate the search process. (Note: Do not hold the fob, just give it a quick squeeze and release.)
- Finally, follow the provided instructions to complete the synchronization.
Note: A PIN is not required for synchronization, only when setting up a new fob.
Note: The 'Fobs Follow User Schedule' is a new facility setting that allows you to determine whether users with fobs will adhere to a universal Fob Schedule (set on the Hours page of the Nokē Smart Entry Web Portal) or if each user with a fob will follow an individual schedule assigned to them. If this Facility Setting is turned 'On', upon the next sync or addition of a new fob, firmware updates will be mandatory for most fobs to enable the individual user schedule feature. Fob firmware versions 3.7 or lower do not support this feature and can only utilize the Fob Schedule. The Mobile App will guide you through the fob firmware update process. However, this is a 2 step process where you must first update the firmware, and then once that is complete, you sync the fob again to complete the process.
If the 'Fobs Follow User Schedule' facility setting is enabled and you are adding a fob for the first time, if the fob has firmware version 3.7 or lower, this process will now involve three steps. Initially, you must add the fob to the tenant, followed by updating the firmware, and finally, syncing the fob again to finalize the process.
Note: To sync or add Fobs, ensure that your Mobile App is updated to the latest version (2024.1). If you encounter any issues, the first troubleshooting step is to check the version number of the Mobile App. You can locate this information within the Mobile App by accessing Settings (identified by the three horizontal lines icon in the bottom right corner) and selecting 'About'.
If the Mobile App is not on version 2024.1 or later, it will need to be updated. Tenants can do this by navigating to either the Google Play Store or the App Store and searching for the 'Storage Smart Entry by Nokē' app. If an update is available, it will be displayed, and tenants can proceed to update the app.
For Android devices, after adding a new fob, you will need to sync it. The Mobile App will prompt you to do so if the 'Fob Schedule' setting is turned 'Off'.
Removing a Fob Assigned to a Current Tenant
To unassign a fob,
- Log in to the Nokē Smart Entry Web Portal from your manager account.
- Navigate to the Users tab.
- Scroll or search to find the tenant who is currently assigned to the fob and click on her user name.
- On the User Details page, click the Settings (gear icon) in the top right corner of the first widget.
- Click the Fobs tab.
- Select Remove Fob.
Chapter 6: FAQ (Frequently Asked Questions)
The Nokē Smart Entry system provides various ways for you to find help and answers to your questions, ranging from a searchable website of frequently asked questions to live chat sessions with a support specialist.
These available help resources include:
- Resource Center: The question mark (?) icon in the bottom right corner of the screen provides access to additional training resources, including walkthroughs, webinar training recordings, release notes, best practices, and more.
- FAQs: From the Web Portal’s tab menu, click Help > FAQs to access an FAQ page on our NSE Help Center website.
- Nokē Smart Entry Help Center: The NSE Help Center is a searchable knowledge base of frequently asked questions. This is what you're currently viewing.
- Live Chat: You can text directly with a member of our 24/7 support team by clicking the icon in the bottom-right corner of the Web Portal. A friendly Nokē support staff member will assist you with your question.
- Trending Support Questions: From the Web Portal’s Home page, you can view the top four trending support questions, which include links to the most popular knowledge base articles.
- Mobile App Instructions: From the Web Portal’s tab menu, click Help > App Instructions to display instructions for how tenants can download and log into the Nokē Storage Smart Entry mobile app.
- Suggest Improvements: From the Web Portal’s tab menu, click Help > Suggest Improvement to display a form for requesting new features or functionality for the Web Portal and the Nokē Storage Smart Entry mobile app.
- Contact Us: From the Web Portal’s tab menu, click Help > Contact Us to display the 24/7 Support Desk phone number. Alternatively, you can submit a help ticket with basic information about your issue and how you would like the support staff to contact you.
Troubleshooting Mobile App Access Issues for Nokē Storage Smart Entry
If a tenant is experiencing problems with the Nokē Storage Smart Entry mobile app, such as being unable to access entry/exit points or open their unit, follow these troubleshooting steps in order. After each step, check if the issue has been resolved.
1. Verify Smartphone Compatibility
Ensure the tenant’s smartphone meets the minimum system requirements for the Nokē Storage Smart Entry mobile app:
- iOS (Apple): iPhone 5S or newer models, running iOS 12.0 or higher.
- Android: Android Galaxy S6 or newer models, running Android 6.0 or higher.
If the smartphone is not compatible, the tenant will need to use a compatible device.
2. Enable Location and Bluetooth
For Android users:
- Location Services: Verify that Location Services are turned on. This can be done by navigating to Settings > Connections > Location.
- App Location Permissions: Ensure that location permissions are granted to the Nokē Storage Smart Entry app. Go to Applications > Nokē Storage Smart Entry mobile app > Permissions, and ensure location access is enabled.
For Bluetooth:
- Bluetooth: Ensure that Bluetooth is enabled on the smartphone. The app requires Bluetooth to communicate with entry points and the unit. If Bluetooth is turned off, the tenant will receive a pop-up notification asking to enable it.
3. Restart the Mobile App
- Close and Re-open: Have the tenant fully close the Nokē Storage Smart Entry app and re-open it. This can help resolve minor app glitches.
- Turn Bluetooth Off/On: In some cases, turning Bluetooth off and then back on can help resolve connection issues.
4. Power Cycle the Smartphone
Ask the tenant to power cycle their smartphone by turning it off, waiting a few seconds, and then turning it back on. This can help resolve any temporary device-related issues that might be causing access problems.
5. Check for Latest App Version
- App Version: Verify that the tenant is using the latest version of the Nokē Storage Smart Entry app. To check the app version, go to Settings > About within the app. Compare the version number with the latest version available in the App Store (for iPhone) or Google Play Store (for Android).
- If the app is outdated, ask the tenant to update the app to the latest version.
6. Try a Different Device
If the problem persists, have the tenant download the Nokē Storage Smart Entry app on a different smartphone or tablet (Bluetooth-enabled) and log in using the same account credentials. This can help determine whether the issue is specific to the original device.
7. Verify Network Connection
Ensure the tenant’s device has an active cellular or Wi-Fi connection. The mobile app requires an internet connection to receive digital key credentials.
- Refresh Digital Keys: Have the tenant tap the Refresh icon (located in the middle-right portion of the app’s Home screen) to manually refresh the credentials.
8. Confirm Unit Assignment
-
Unit Icon Not Displayed: If the unit icon is missing from the mobile app, it’s important to verify that the tenant is assigned to the unit. This can be checked in the Nokē Storage Smart Entry Web Portal.
-
If the tenant is not assigned to the unit, navigate to the Nokē Web Portal, and click the ‘Update Customer Data’ button on the Navigation menu to update the tenant’s unit assignment.
Troubleshooting Text Message Issues
If a tenant does not receive a text message on their smartphone after being successfully added to your Property Management Software (PMS) system, follow these troubleshooting steps in order. After each step, check if the issue is resolved.
1. Verify Tenant Information in PMS
Ensure the correct and valid cell phone number is entered and attached to the tenant in your facility’s Property Management Software (PMS). The tenant's phone number is used for text message delivery, and if the number is incorrect, the message will not be sent.
- If the number is incorrect or missing, re-enter the correct number in your PMS.
- After updating the phone number, click the ‘Update Customer Data’ button in the Nokē Smart Entry Web Portal to ensure the data is synced properly.
2. Confirm Smartphone Compatibility
Ensure that the tenant is using a compatible smartphone to receive the text messages:
- iOS: iPhone 5S or newer models, running iOS 12.1 or higher.
- Android: Android Galaxy S6 or newer models, running Android 6.0 or higher.
If the tenant is using an incompatible device, they may not be able to receive messages.
3. Check Airplane Mode and Cellular Service
Ensure the tenant's smartphone is not in airplane mode and that their cellular service is active. Verify that their phone is connected to the network and capable of receiving text messages.
- Airplane Mode: If the phone is in airplane mode, disable it and ensure the phone is connected to cellular service.
- Cellular Service: Verify that the phone has a strong signal and is connected to the mobile network.
Troubleshooting Account Creation Issues for Nokē Storage Smart Entry
If a tenant is experiencing difficulty logging in to the Nokē Storage Smart Entry mobile app and creating an account, follow these steps to resolve the issue.
1. Check Network and Connectivity
- Ensure Network Access: Confirm that the tenant's smartphone is not in airplane mode and that they have a stable cellular connection or Wi-Fi. Without internet access, the app cannot verify credentials or complete the account creation process.
- Test Connectivity: Ask the tenant to browse a website or use another app to ensure they are properly connected to the internet.
2. Verify the Correct Username and Activation Code
-
Username: Verify that the tenant is entering the correct mobile number OR email address in the ‘Username’ field. This is the number they registered with during their account setup.
-
Activation Code: Ensure that the tenant is using the correct activation code in the ‘Password’ field. The activation code is sent via SMS during the account creation process and must be entered exactly as received.
-
Expiration Check: Activation codes are time-sensitive. They typically expire after 24 hours from the time they were sent. If the tenant attempts to use an expired code, they will need to request a new one.
-
Request New Activation Code: If the activation code has expired or if the tenant didn’t receive it, they will need to request a new activation code..
-
3. Ensure the Activation Code Is Valid
-
Confirm Expiration: If it’s been longer than 24 hours since the tenant received the activation code, it may have expired.
- You can resend an activation code to the tenant by following these steps:
- Log in to the Web Portal.
- Click on the Users tab.
- Scroll or use the search bar to find the tenant.
- On the user’s row, click the ellipsis (⋯) on the far right.
- From the Quick Options menu, select Activate Account.
- If the tenant does not have an email or phone number on file, this option will be grayed out.
- You can resend an activation code to the tenant by following these steps:
4. Retry Account Creation
If the tenant has verified the above details and is still experiencing issues:
- Have them restart the app and try entering the username and activation code again.
- If possible, reinstall the app to eliminate any potential glitches or corrupt data that could be hindering the login process.
5. Additional Troubleshooting Tips
-
Clear Cache or Reinstall App: In some cases, app-related issues can prevent successful account creation. Suggest that the tenant clear their app cache or uninstall and reinstall the Nokē Storage Smart Entry app to resolve potential conflicts.
-
Check Device Compatibility: Ensure that the tenant's device meets the minimum requirements for the mobile app. An outdated device or OS version might cause issues with app functionality.
Troubleshooting Password Issues for Nokē Storage Smart Entry
If you are experiencing password-related issues with the Nokē Storage Smart Entry mobile app or Web Portal, follow these steps to resolve the issue. This guide will help you address common password problems, such as forgotten passwords or login errors.
1. Forgotten Password
If the tenant has forgotten their password, they can easily reset it by following these steps:
Mobile App
- Open the Nokē Storage Smart Entry Mobile App.
- On the Login screen, tap ‘Forgot Password?’.
- Follow the on-screen instructions to receive a password reset email.
- Check the email inbox for instructions and follow the link to reset the password.
- Once the password is reset, the tenant can log in with the new password.
Web Portal
If you have access to the Nokē Smart Entry Web Portal, you can initiate a password reset for the tenant:
- Log in to the Nokē Smart Entry Web Portal.
- Navigate to the Users section and search for the tenant.
- Click on the tenant’s name to view their account details.
- Click the ‘Gear’ icon (Settings).
- Under the ‘Information’ section, click ‘Send via Email’ next to Reset Password.
- This will send a password reset email to the tenant with instructions on how to reset their password.
2. Common Login Errors
If the tenant is still unable to log in after resetting the password, consider the following:
- Incorrect Email or Username: Ensure that the tenant is using the correct email address or username associated with their account. A common issue is mistyped email addresses or forgotten usernames.
- Check Email Inbox and Spam Folder: Verify that the password reset email was received. Ask the tenant to check their Spam or Junk folder, as it may have been incorrectly filtered.
- Account Locked: After multiple failed login attempts, the account may be temporarily locked. In this case, the tenant may need to wait for a reset period or contact support for further assistance.
3. Account Creation Issues
If the tenant has not yet created an account or is unable to access the app after following the reset process:
- Confirm Account Activation: Ensure that the tenant has received an activation email when initially signing up for the app. The activation link must be clicked to activate the account.
- Verify Access Permissions: Confirm that the tenant has the proper permissions set within the Nokē Smart Entry system (e.g., access to specific units or facilities). If they don’t, they may need their access permissions updated by the facility manager.
4. Additional Troubleshooting Tips
-
- Clear Cache or Reinstall the App: Sometimes, app glitches can prevent successful login. Suggest the tenant clear the app cache or reinstall the app to eliminate any potential issues.
- Update the App: Make sure the tenant is using the most recent version of the mobile app. Outdated versions may cause issues with logging in.
- Check Internet Connection: Ensure the tenant has a stable internet connection, as login failures can occur when the app cannot reach the server due to poor connectivity.
.png?height=120&name=noke_vertical%20(1).png)