Shows how to add a fob for your tenant via the tenant's mobile app or the facility manager's account. Also covers syncing a tenant's fob to additional units or transferring to another unit, and how to delete a fob account.
Setting Up a Fob for Your Tenant
While the goal is to set up all tenants with the Nokē Storage Smart Entry mobile app for seamless, secure access, some tenants may prefer or require an alternative. For these customers, a keyless fob is available.
Encouraging App Usage
Before setting up a fob, highlight the advantages of using the mobile app, including features unavailable with a fob. Reassure tenants that you’ll gladly assist with fob setup if needed. Many tenants are won over by the ease and convenience of the app once they try it.
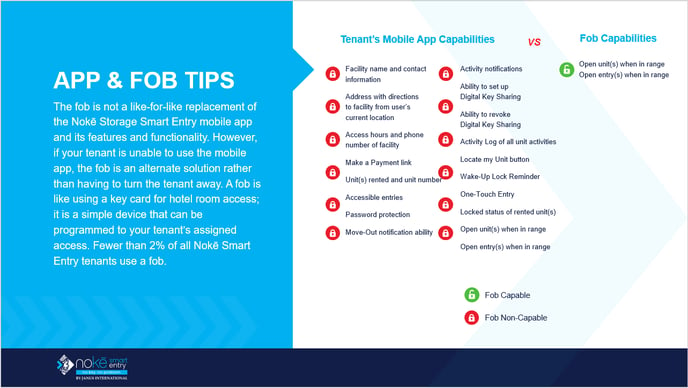
Fob Capability vs. App Features
While the mobile app offers the most comprehensive access features, the fob option accommodates tenants whose devices are incompatible with the app or who prefer a simpler option.
Key Difference:
- Adding a Fob is for tenants who do not already have a fob.
- Syncing a Fob is for tenants updating existing fob access (e.g., new unit or changes).
Adding a Fob Using the Tenant’s Mobile App
- Log in to the tenant’s Nokē Storage Smart Entry mobile app.
- Tap the Settings icon (bottom-right corner).

- Tap Fobs.

- When prompted, press the fob once to wake it up. A text box will appear.

- Enter a name for the fob in the text box.

- Tap the right arrow to save. The new fob will appear in the list.

Pro Tip: Test the fob’s functionality with the tenant at your facility’s designated entry points and their unit. Demonstrate how:
- The fob operates with a single press when in range.
- The fob’s indicator light responds to commands, signaling successful operation.
Adding a Fob Using the Manager’s Mobile App
If necessary, you can use the manager’s mobile app to add a fob.
- Log in to your Nokē Storage Smart Entry mobile app with your manager account.
- Tap the (+) icon in the top-right corner of the home screen.
- Select Add Fob to Tenant.
- Choose the tenant from the list or search for their name.
- The system will send the tenant a text message with a confirmation code.
- When prompted, press the fob once to wake it up.
- Enter a name for the fob and the tenant’s confirmation code.
- Tap the right arrow to save. The new fob will appear in the list.
Reminder: Test and demonstrate the fob’s functionality as outlined above.
Syncing a Fob
If a tenant updates their access (e.g., rents an additional unit or transfers units), the fob must be synced to reflect the changes.
To sync a fob using the tenant’s mobile app:
- Log in to the tenant’s Nokē Storage Smart Entry mobile app.
- Tap the Settings tab (bottom-right corner).
- Tap the Fobs tab.
- Tap Sync.
- When prompted, press the fob once to wake it up. The fob’s indicator light will blink during the sync process.
- Wait for the fob to fully sync. The tenant will then have updated access.
Deleting a Fob
If the tenant no longer requires a fob, you can delete it from their mobile app.
To delete a fob:
- Log in to the tenant’s Nokē Storage Smart Entry mobile app.
- Tap the Settings tab (bottom-right corner).
- Tap the Fobs tab.
- Swipe left on the fob you want to remove.

- Tap Delete. The fob will be removed from the tenant’s account.
By following these guidelines, you ensure tenants have a seamless experience while maintaining security and minimizing liability. Always prioritize using the tenant’s mobile app for any fob-related tasks whenever possible.
For more information, click below:
Explaining Why Shared Users Cannot Use Fobs
Using the Tenant's Mobile App
Understanding the Demo Mode on the Mobile App
.png?height=120&name=noke_vertical%20(1).png)